
How to draw cricket ground
Drawing a cricket ground may seem like a complicated task due to its numerous components, but once you break it down into simple steps, it’s actually quite manageable. It requires understanding the basic layout of a cricket pitch and represents various elements that are prominent in the game of cricket. The whole process can be described under four main headings: sketching, outlining, adding details and finishing touches.
Sketching
The first step is to create a rough sketch of your ground on paper or digital art software. Begin by setting out two circles – one big and another smaller inside it. The bigger one symbolizes the boundary while the inner circle indicates the 30-yard circle within which close-in fielders stand. Ensure you maintain correct proportions between these spaces for an accurate depiction.
Next, draw two rectangles at the center of your page overlapping each other slightly; these represent the pitch where bowlers throw the ball and batsmen hit it. Remeber to add both ends (the batting/bowling creases) where stumps are placed.
Central Pitch Details
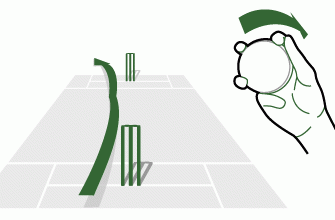
On these rectangular patches also known as pitches, you should sketch three vertical lines to denote wickets/stumps on either end. These lines need not be very tall compared to other features because they’re only about 28 inches high in real life. To complete this aspect, make sure to put square-shaped ‘bails’ atop these stumps.
Outlining
After laying down initial sketches, outline them with darker shade/marker/pen/software tool for better clarity and effect. This involves going over all previously drawn parts i.e., circumference of outer boundary & inner circle, edges of pitch rectangles and individual stumps including bails.
Further refine shapes based on actual appearances such as making boundaries curve naturally, squaring corners of respective areas especially those near cental strip etc. Being meticulous in this approach will lead to a properly defined cricket ground.
Full Video in Youtube
Paths and Sight Screens
Most grounds include pathways leading to pitches from pavilions where players rest & change. Creating these can help maintain real-life accuracy. They’re usually straight lines on either side of pitch, showing entry/exit points for teams involving spectators seating area (stands/stadium).
While outlining ways, remember to portray sight-screens behind both ends of the central strip for batsmen’s convenience as they encounter fast-moving balls against contrasting backgrounds. They may resemble taller rectangular block shapes.
Add Details
Now that your basic outline is ready, fill in details like grass texture on field using criss-cross or stippling techniques depending upon the mediums you opted. For instance prefer green color shades possible through watercolors, pencils, markers etc., as cricket matches often occur on lush green landscapes due its prolonged durations spanning hours sometimes even full days.
Markings on Pitch
Projects complete without imitating crease lines/paint marks over central pitch; commonly seen during televised games enhancing viewership experiences. Make sure every bowler’s and popping/batting creases are visible apart from return creases near stumps – all resembling white-ish hue because powder/spray paints used by actual caretakers out there in playgrounds across globe.
Finishing Touches
Upon completion of detailing, step back and review overall work while comparing with reference images available online especially official websites/articles related cricket sports documentations helping get sense accurateness throughout illustration process. If errors/mistakes found redo respective parts until satisfied outcome achieved finally sign-off masterpiece after drying (in case hued variants involved).
Cricket indeed popular contest whereas its fanatics take interest not only understanding rules but also admiring infrastructure surrounding it talking about fields barring mere athletes participates within hence essence discussing “how to draw cricket ground”? Hopeful this step-by-step guide proves beneficial for remains enthusiast wants representing sport through own art works moving forward. Feel free adjusting proportions/features according preferences while using best creative freedom expression moreover enjoying journey amidst having fan-fave player’s highlights carves onto mental canvas foreground rest will automatically fall places fittingly. Happy Drawing!